Perfect for any rail system, these low-profile gas blocks are the ideal companion for barrels with a standard diameter gas journal. The gas block secures on to the barrel using (2) set screws on the bottom of the gas block. We highly recommend the use of Loc-Tite or similar thread-locking compounds. Gas blocks will get very hot, so pick a compound according to your intended use of the firearm. If you are unsure of how to properly install and align your adjustable gas block, use the services of a qualified gunsmith. Read through the following to familiarize yourself with each step.
Recommended Tools
- Gunsmithing hammer
- Roll pin punches
- Loc-Tite
- Allen wrenches
Mounting
- Remove your handguard, muzzle device, and current gas block from your firearm.
- If you’re reusing your gas tube, remove the roll pin from the gas block and separate the two.
- It’s a good idea to clean the parts prior to installation, paying attention to the barrel where the gas block will sit.
- Install the gas tube into the adjustable gas block and drive in the provided roll pin to secure the gas tube into the adjustable gas block. Pay attention to the orientation of the gas tube.
- Loosen the (2) bottom set screws on the bottom of the adjustable gas block and slide it onto the barrel making sure the gas tube passes into the hole of the upper receiver.
- Ensure the adjustable gas block is seated against the shoulder of the barrel, line the gas tube to the 12 o’clock, or top dead center, position on the barrel and tighten the (2) bottom set screws on the bottom of the adjustable gas block.
- Reinstall your handguard and muzzle device.
Notes: Some barrel nuts will interact differently with gas tubes depending on style. Refer to your specific manufacturer for instructions. Depending on your skill level, you may want to test fire the firearm prior to using Loc-Tite on the (2) bottom set screws, to ensure you have proper alignment.


Adjustable Gas Block Tuning Instructions
The adjustable gas block is set to 100% open when we assemble them to ensure functionality on a variety of firearm and ammo combos. Different ammo, barrel lengths, temperature, and/or adding a suppressor can change your firearms gas requirements, so additional tuning may be required depending on your configuration.
Tuning
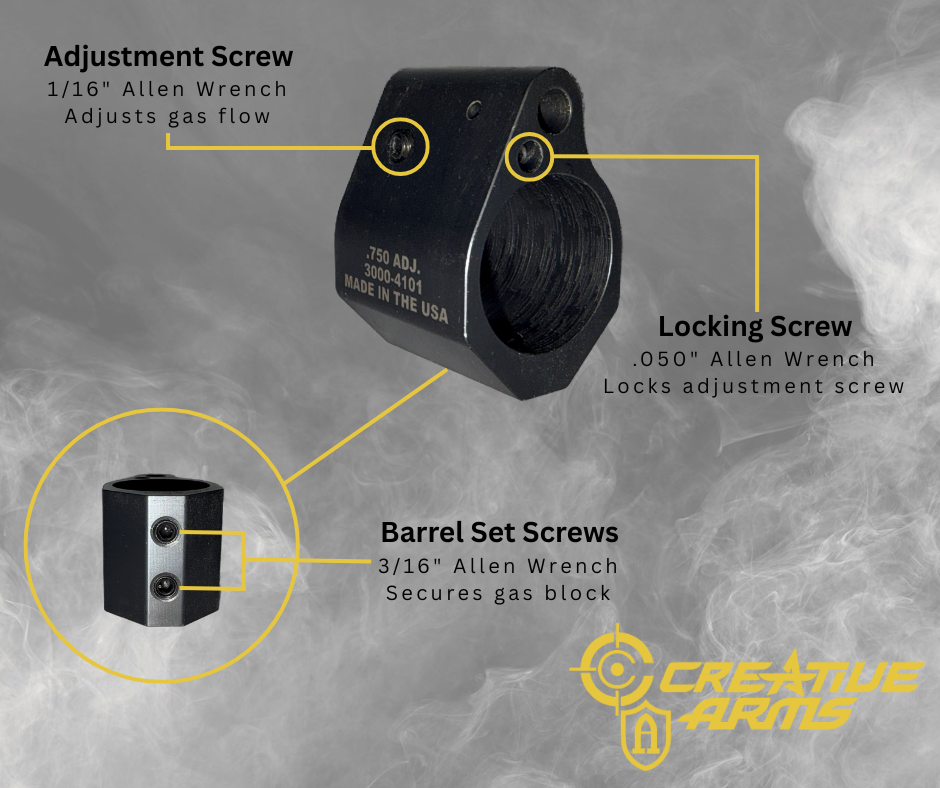
- Loosen the brass tipped locking set screw on the front of the gas block.
- Tighten the adjustment set screw on the righthand side all the way in.
- Loosen the adjustment set screw two full rotations.
- Tighten the brass tipped locking set screw on the front of the gas block to lock in the adjustment.
- Load (2) rounds and test fire. You’ll be checking for proper ejection, cycling, and if your BCG locks in the rearward position.
- Depending on the test fire results, make further adjustments by loosening the brass tipped locking set screw, and by loosening (opening) or tightening (closing) the adjustment set screw. Repeat test firing until you’re satisfied with the result.
- When you achieve your desired rifle function (tune) tighten the brass tipped locking set screw.
Notes: Depending on your handguard, you may need to remove it while tuning the adjustable gas block. Tuning is very subjective so play around with it until you’re satisfied.